Streamlining IAM Role Creation for S3 Bucket Access with AWS Policy Generator: A Step-by-Step Guide
Celestinfo Software Solutions Pvt. Ltd.
•
May 12, 2025
Amazon Simple Storage Service (S3) is a scalable, secure, and highly available object storage service. Creating an S3 bucket is a straightforward process that can be completed in just a few minutes. In this blog, I’ll guide you through the process of creating an S3 bucket in 5 simple steps using the AWS Management Console, complete with descriptions of where to include screenshots for clarity.
Pre-requisites
- An AWS account with access to the AWS Management Console.
- Appropriate IAM permissions to create S3 buckets and roles.
Step 1: Sign in to the AWS Management Console
Navigate to the AWS Management Console and sign in with your AWS account credentials. Once logged in, you’ll land on the AWS Console homepage.
Step 2: Access the S3 Service
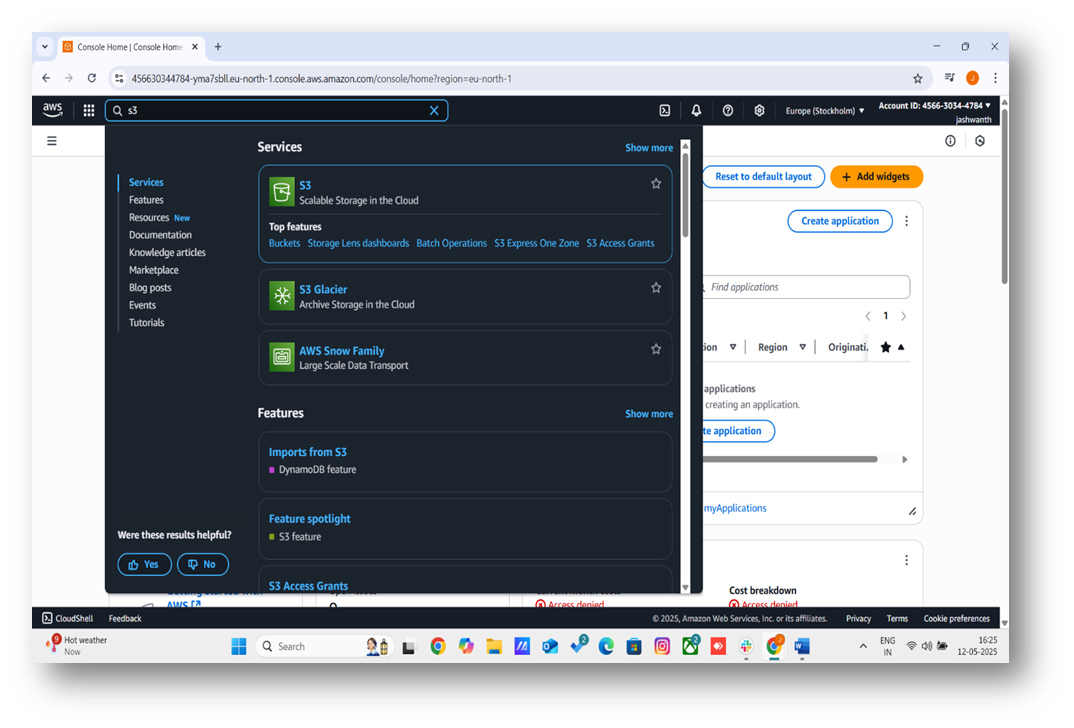
In the AWS Console, type “S3” into the search bar at the top and select “S3” from the results. Alternatively, find “S3” under the “Storage” category in the services menu. This will take you to the S3 dashboard.
Step 3: Start Creating a Bucket
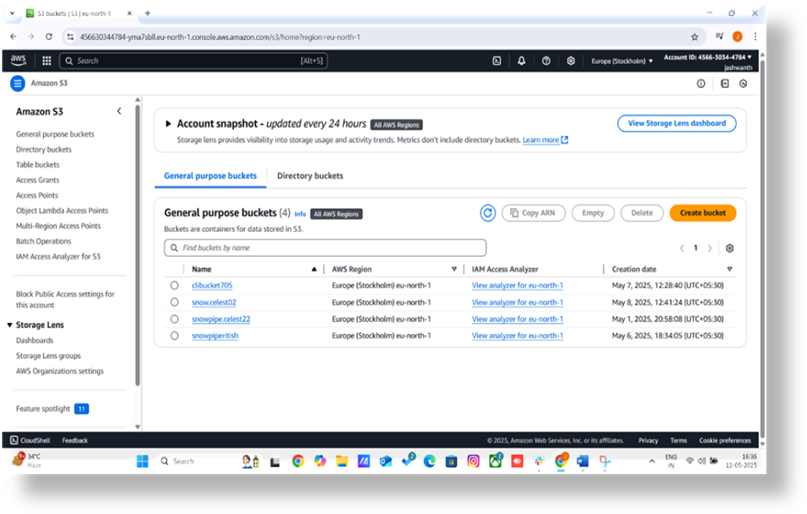
On the S3 dashboard, click the orange “Create bucket” button. This opens the “Create bucket” form where you’ll configure your bucket settings.
Step 4: Configure Bucket Settings
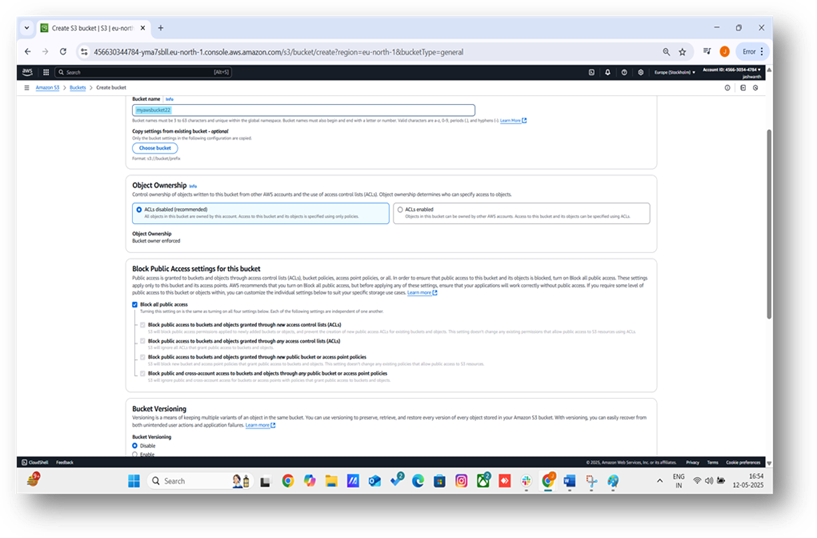
Fill out the required fields in the “Create bucket” form:
- Bucket Name: Enter a globally unique name for your bucket (e.g., my-unique-bucket-2025). Bucket names must follow AWS naming rules, such as being lowercase and not containing spaces.
- AWS Region: Select the region where you want your bucket to reside (e.g., US East (N. Virginia) us-east-1).
- Object Ownership: Choose “ACLs disabled” (recommended for most use cases) unless you need Access Control Lists.
- Block Public Access: For security, enable “Block all public access” unless your use case requires public access.
- Bucket Versioning: Optionally enable versioning if you need to keep multiple versions of objects.
- Encryption: Enable default encryption (e.g., SSE-S3) for added security.
Leave other settings as default unless you have specific requirements. Scroll to the bottom and click “Create bucket.”
Once your S3 bucket is created, configure permissions by setting up access policies or enabling public access for specific use cases like hosting static websites. Explore S3’s distributed architecture, which ensures high durability by replicating data across multiple Availability Zones in your chosen region. Upload raw data, such as CSVs or logs, using the Console’s drag-and-drop feature, and enable versioning to track changes. Monitor costs with the AWS Pricing Calculator, as S3 pricing depends on storage, requests, and data transfers, with savings possible through Lifecycle policies.
Step 5: Verify Bucket Creation
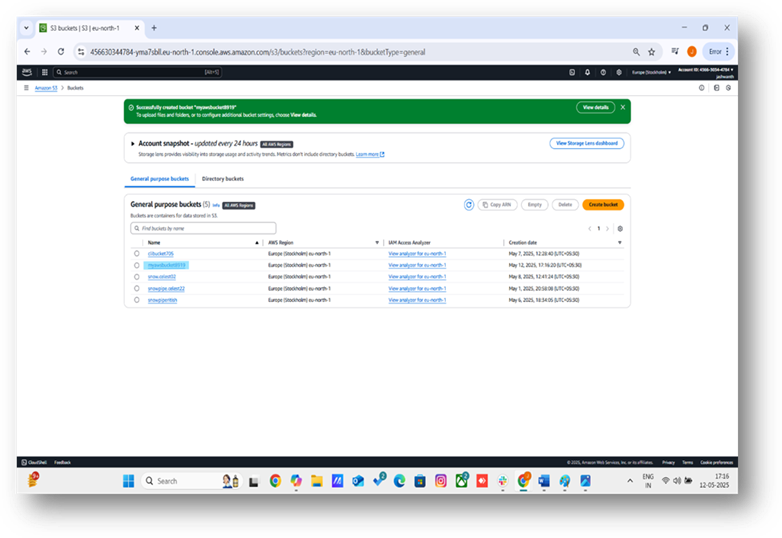
After clicking “Create bucket,” you’ll be redirected to the S3 dashboard, where your new bucket will appear in the list. Click on the bucket name to view its details and confirm it was created successfully.
Conclusion
Congratulations! You’ve successfully created an Amazon S3 bucket. You can now use this bucket to store objects, host static websites, or integrate it with other AWS services. For more advanced configurations, explore features like lifecycle rules, bucket policies, or CORS settings in the AWS S3 documentation.
How to link an IAM Role for an S3 Bucket
After creating an S3 bucket, you need to grant AWS services or users controlled access to it. An IAM role is a secure way to delegate permissions without embedding credentials. This guide walks you through creating an IAM role for an S3 bucket using the AWS Management Console, with screenshots to illustrate each step.
Prerequisites
- An AWS account with administrative access.
- An existing S3 bucket (e.g. myawsbucket8919).
1. Navigate to the IAM Console
- Log in to the AWS Management Console.
- Search for "IAM" in the search bar and select the IAM service.
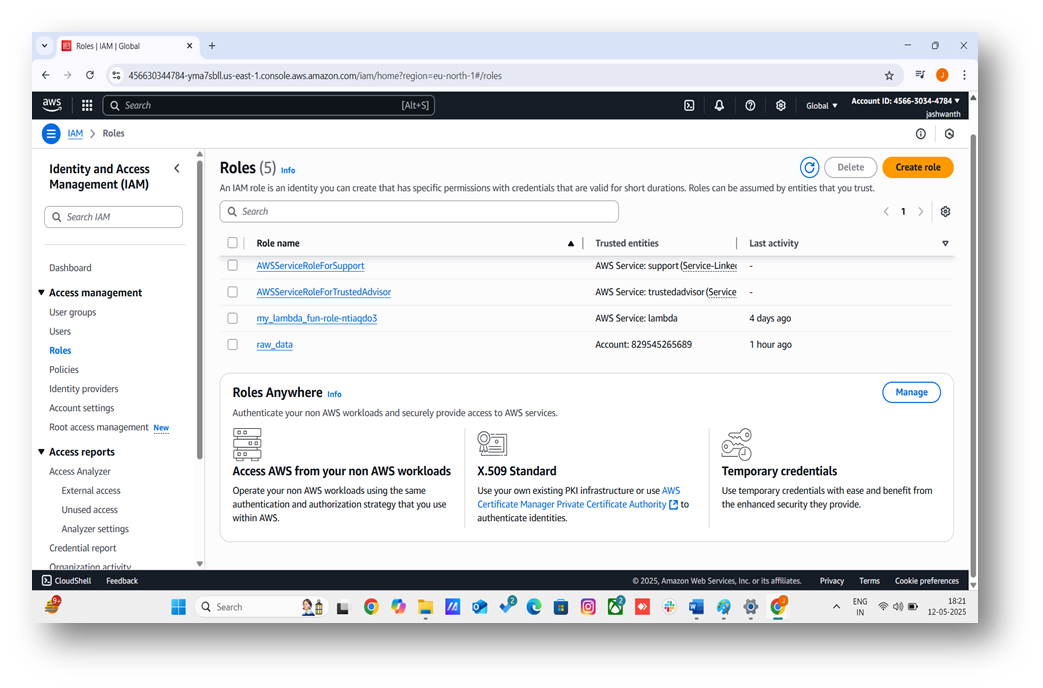
- In the left-hand menu, click Roles under "Access management."
2. Create a New IAM Role
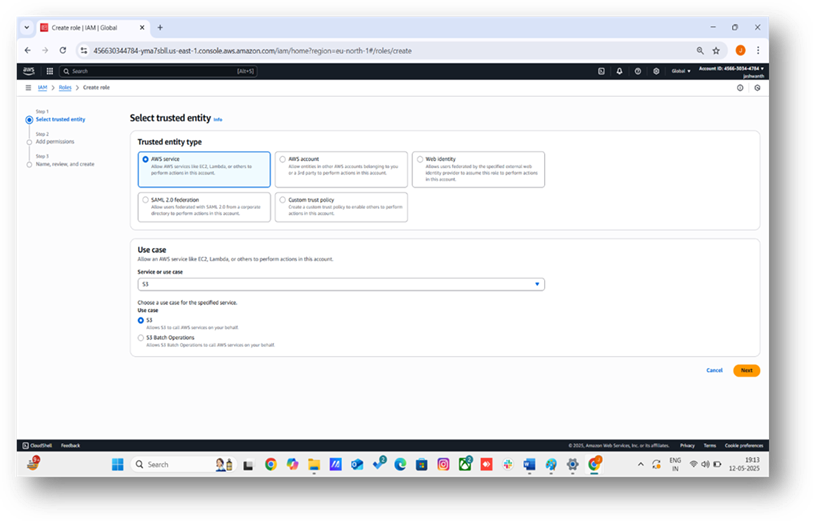
- Click the Create role button.
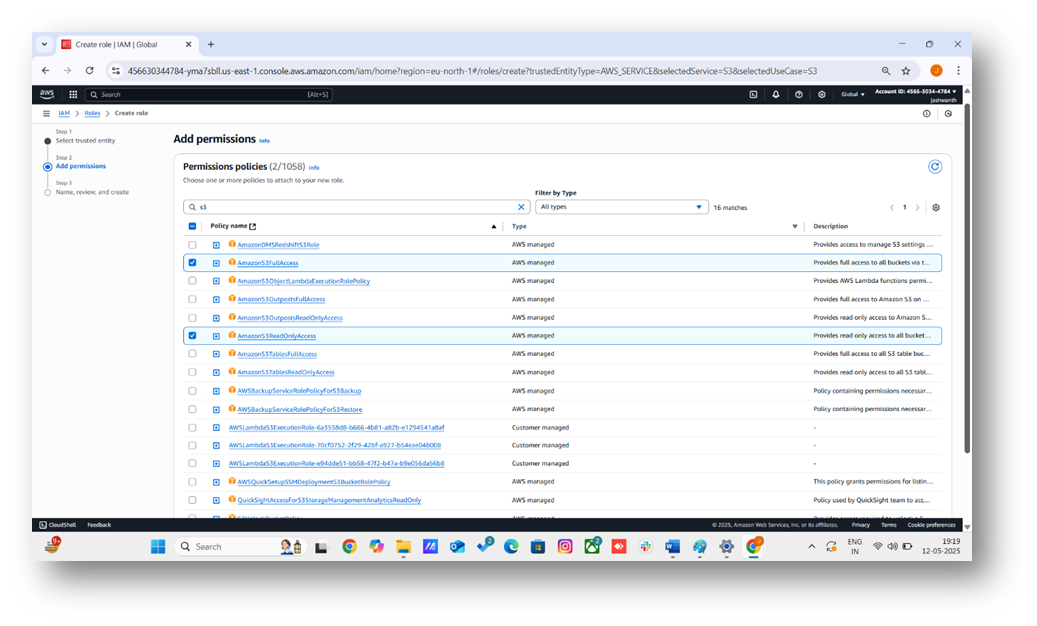
- Select AWS service as the trusted entity type (e.g., for an EC2 instance or Lambda function accessing the S3 bucket).
- Choose the specific service (e.g., EC2, Lambda, s3etc.) and click Next.
3. Define the Role Trust Policy
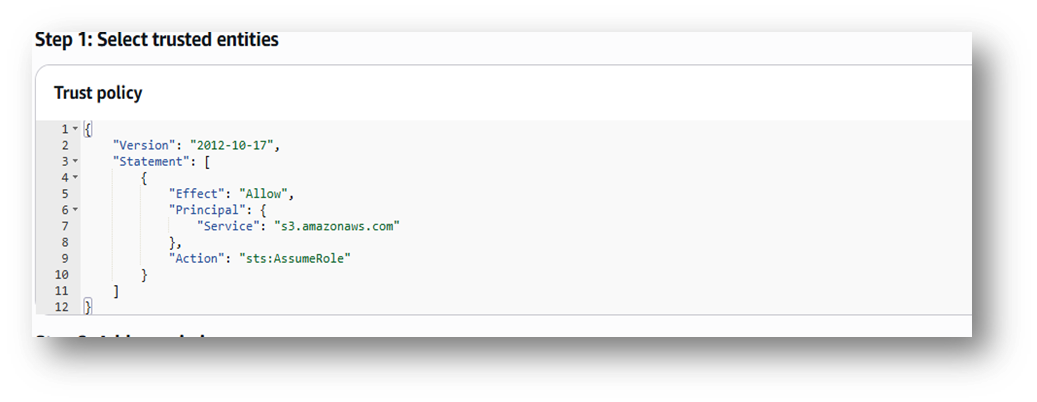
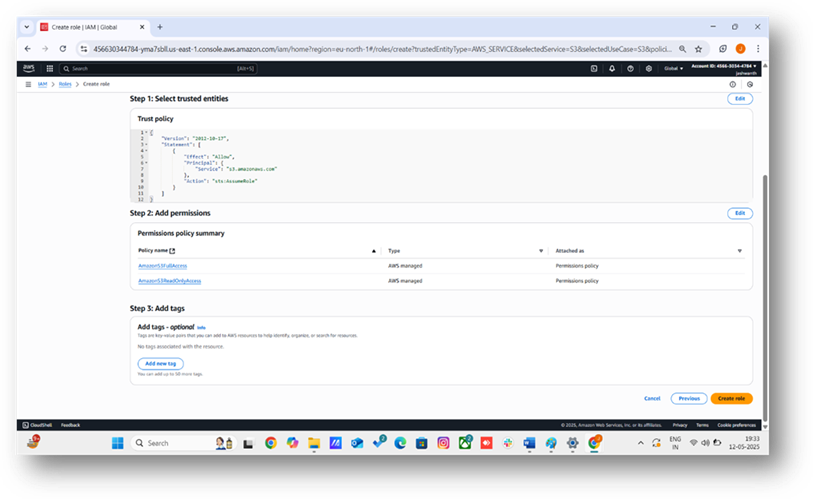
- The role trust policy specifies that the S3 service can assume the role. AWS generates a trust policy for S3:
- This policy allows the S3 service to assume the role. It includes a Principal (s3.amazonaws.com) and no Resource to avoid syntax errors. AWS applies this automatically for the S3 service. Click Next: Permissions.
4. Create the Permissions Policy Using AWS Policy Generator
- The permissions policy defines what the role can do. For this S3 use case, we’ll create a policy for read-only access to myawsbucket8919 (e.g., to allow the role to read objects or list the bucket when assumed by S3):
- In the permissions section, click Create policy.
- Select the Visual editor tab, then click Policy Generator (link at the bottom).
- Configure the policy: Effect: Select Allow. AWS Service: Select Amazon S3. Actions: Check GetObject and ListBucket. Amazon Resource Name (ARN): For ListBucket, enter arn:aws:s3:::myawsbucket8919. For GetObject, enter arn:aws:s3:::myawsbucket8919/*. Click Add Statement.
- Click Next Step.
- Name the policy S3ReadOnlyMyBucket, add an optional description (e.g., "Read-only access to myawsbucket8919"), and click Create policy.
- The generated policy is equivalent to:
- Back in the role creation wizard, refresh the policy list, search for S3ReadOnlyMyBucket, select it, and click Next: Tags.
5. Configure Role Details
- Add optional tags (e.g., Purpose: S3Access).
- Click Next: Review.
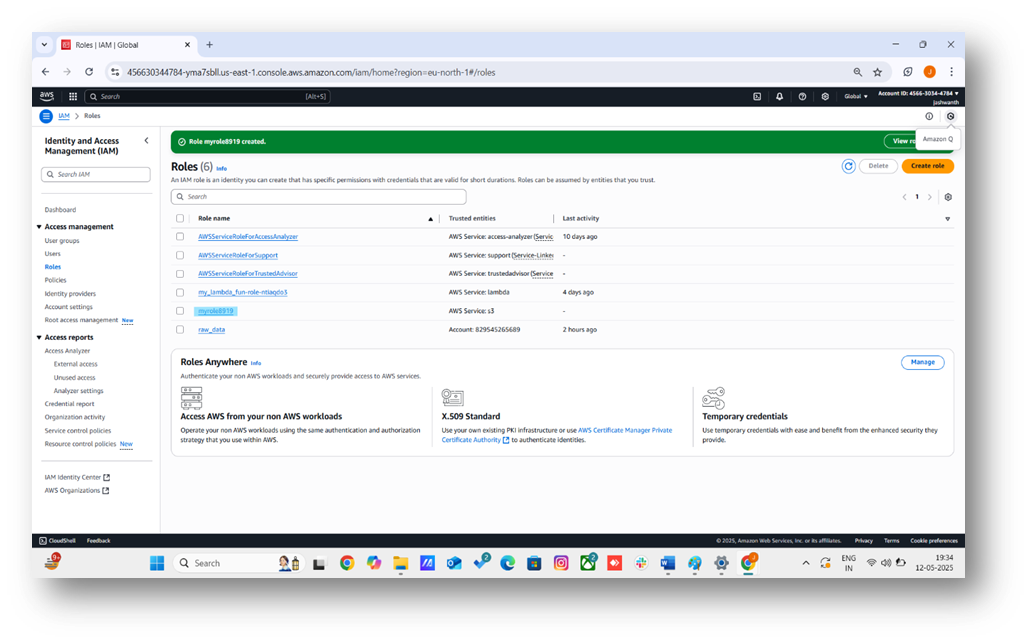
- Enter a Role name (e.g.myrole8919).
- Add an optional description (e.g., "Role for S3 service to access myawsbucket8919").
- Click Create role.
Best Practices
- Least Privilege: Use specific actions (s3:GetObject, s3:ListBucket) instead of s3:*.
- Clear Naming: Use names like S3ReadOnlyMyBucket to indicate purpose.
- Monitor Access: Use AWS CloudTrail to track role actions.
Troubleshooting
- JSON Syntax Errors: The Policy Generator avoids manual JSON input, eliminating errors like those at line 6, column 6. If editing JSON manually, validate it at jsonlint.com.
- Missing Principal: The trust policy (step 3) includes "Service": "s3.amazonaws.com".
- Resource in Trust Policy: Trust policies must not include Resource. The Policy Generator ensures Resource is only in the permissions policy.
- Incorrect ARN: Verify myawsbucket8919 is entered correctly in the Policy Generator.
Conclusion
You’ve created an IAM role for the S3 service to securely access myawsbucket8919 using the AWS Policy Generator, avoiding JSON syntax errors. Use this role in S3-related use cases like Lambda triggers or other AWS service integrations. For advanced setups, explore policy conditions or cross-account access.


